
Whether you’re looking to self-install new flooring or you want some help, you won’t want to miss this guide.
How to Choose & Install the Right Flooring for Your Home – The Ultimate Guide to Flooring Installation
The right flooring adds function and beauty to your home. It can boost your resale value, reduce noise, reflect your style, and offer improved durability for typical wear and tear. But with so many options to choose from, selecting the right option can be overwhelming. Here are some questions and factors to consider when you are making that decision.
- What is your personal style and the architectural style of your home? Are you happy with the current look of your home? If not, now is the time to make a change. You should also aim to select flooring that aligns with the architectural style of your home.
- What is your lifestyle like? Consider the amount of foot traffic your floors will get and who will be walking on them. You should also think about anyone in your home that has allergies and any environmental concerns you may have. The answers to these questions should be non-negotiables for you. Eliminate any options that do not meet those standards.
- What is your budget? You’re looking at a wide range of costs. If you want to go the inexpensive route, carpet, luxury vinyl plank/tile, laminate, or sheet vinyl are great options to consider. If you have a little more money to spend, you can look into hardwood or tile options. Keep in mind that where you live, potential issues with the subfloor, and the status of the existing flooring will affect these costs.
Once you’ve narrowed down your list, it’s time to look into installation options. In this article, we’ll discuss the most common types of flooring and provide tips and best practices for installing them.
How to Install Common Types of Flooring
Every type of flooring is unique — that includes the process of installing it. Here are some common types of flooring and best practices for installing each of them. The supplies you need will vary depending on the flooring you select. Look to manufacturer instructions for guidance on that front.
No matter what you go with, you need to do four things before installing new flooring yourself:
- Measure the square footage of your room before shopping for floors.
- Affix furniture with padding and protectors so they can be moved easily.
- Prepare the subfloor ahead of time. The specific method here will depend on what you are installing.
- Determine the sealing and trim involved with your installation. This will also depend on the construction of your home and the type of flooring you are laying.
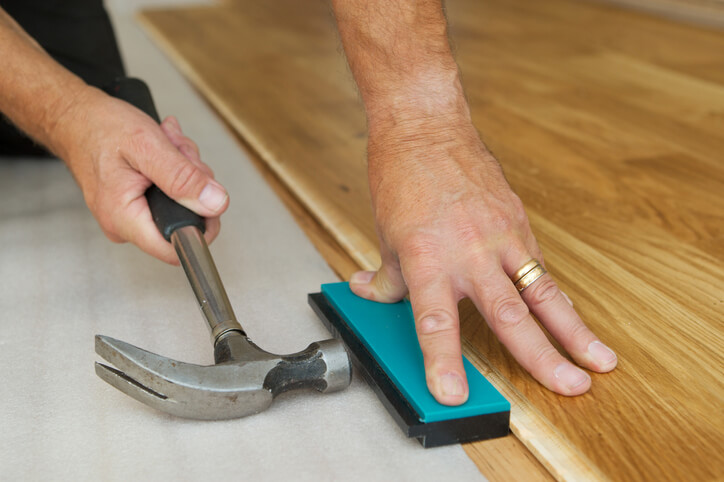
How to Install Laminate Flooring
Take a look at the following tips for installing laminate flooring:
- Prepare the door jambs — Take a plank and a section of underlayment. Lay the finished side down next to the door’s molding. Trace a guideline along the surface of the molding and then cut along that line.
- Plan and cut the first and last rows — Measure the longest wall and divide the distance by the width of the planks. Leave a 3/8-inch gap along both walls to allow for flooring expansion. If the last row is going to be less than 3 1/2 inches wide, consider distributing the width needed between the first and last rows. Cut with the finished side up and use duct tape to mark the plank more easily and reduce splintering.
- Install the underlayment — Roll out the underlayment and trim it to size with a utility knife. Make sure the pieces overlap. If your laminate planks come with underlayment, you can skip this step.
- Install the first row — Place the planks with the tongue side facing the wall. Install the second plank by aligning the tongue into the groove from the first one and it down to snap it in place. When you come to the end of the row, cut the length of plank needed to complete it.
- Install the remaining planks — Start the second row where you left off with the first. Stagger the seams so the flooring is more stable and looks natural. Make sure there are no gaps in between the seams. Finish the job off by removing the spacers and install a matching threshold, baseboard, and quarter-round molding to the walls using finishing nails.
How to Install Hardwood Flooring
Hardwood is one of the most popular choices for homes, as it’s durable and comes in an array of different styles. But before going with this option, it’s important to note that there are three installation techniques you can choose from — glue-down, click-lock, or nail-down. The installation method you go with will likely depend on your skill, subfloor, budget, lifestyle, and the wood flooring you go with:
How to install hardwood flooring with the glue-down method:
- After you’ve prepped the floor, spread adhesive down with a trowel. Only go with enough to work on a few rows at a time.
- Lay your first row down on your starting line.
- Leave a 3/4 inch expansion gap after the last board of the first row.
- When adding the second row, fit the groove onto the first row’s tongue. Tap it into place with a rubber mallet.
- Repeat steps 3 and 4 until you reach the final row. If necessary, cut the width of the boards in the last row to fit.
- Install the baseboard and shoe molding to cover the expansion gap.
- Install threshold or transition strips where the edge of the floor is exposed.
How to install hardwood flooring with the nail-down method:
- Align the first board with the layout line. Have the tongue face into the room. Put a 3/4-inch spacer against the adjoining wall and slide the end of the board against it.
- Drill pilot holes 6 inches apart into the face of the first board. Make sure they’re 1/2- to 1-inch from the edge of the board that’s against the wall.
- Drive 6d or 8d flooring nails through the pilot holes.
- Seat the ends of the tongue and groove planks into each other and push the two boards tightly.
- Nail down the board. Keep going down the row until you reach the side wall.
- Cut the last board of the row to fit and nail it into place. Leave a 3/4-inch expansion gap.
- Put the first board of the new row in place. Place the end against a 3/4-inch spacer and seat the edge snugly against the neighboring plank.
- Drill pilot holes in the tongues and then nail and countersink through the tongues to hold the boards in place.
- Work your way across the room power-nailing the boards in each row through the tongue. Leave a 3/4-inch expansion gap between the end board and the wall. Stagger the ends of the boards in adjoining rows by 6 inches.
- When you get to the last row, cut the boards to width and set them in place.
- Fill any noticeable holes with wood filler.
- Install the baseboard and shoe molding to cover the expansion gap.
- Install threshold or transition strips where the edge of the floor is exposed.
How to install hardwood flooring with the click-lock method:
- Put a 1/2-inch spacer against each wall and slide the end of the board against those spacers.
- Space and drill pilot holes according to the manufacturer’s instructions. Drive flooring nails into those holes.
- Place the upper drop-lock end of the second plank on the lower drop-lock end of the first plank. Keep in mind that these ends do not click lock.
- Cut the last board of the row to fit. Leave a 3/4-inch expansion gap.
- To start each remaining row, cut off a section of the first plank lengthwise to ensure joints are staggered 6 inches apart.
- Hold the plank at about a 30-degree angle with the tongue facing the previous row. Insert the tongue into the groove.
- Press the plank flat to lock the edge of the joints.
- Repeat this process until you get to the last row.
- Install the baseboard and shoe molding to cover the expansion gap.
- Install threshold or transition strips where the edge of the floor is exposed.
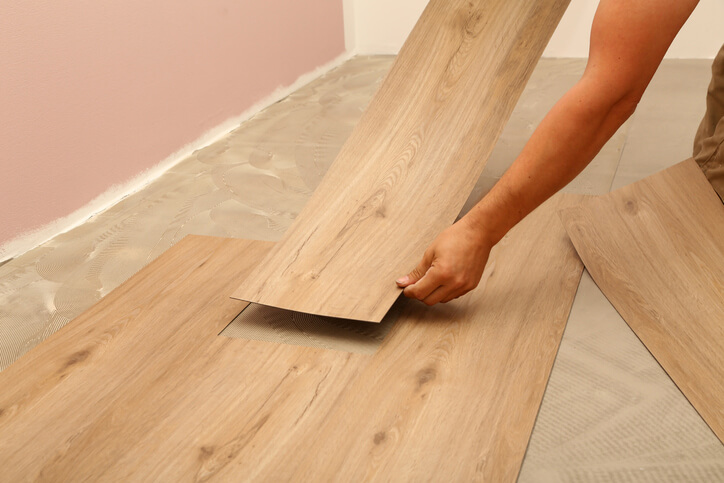
How to Install Luxury Vinyl Plank Flooring
If you like the look of hardwood, but it’s out of your budget, vinyl plank flooring is a great option. This flooring is not as environmentally friendly as hardwood, but it is more impervious to water damage. It should also last you between 10-20 years. Here’s how you can install luxury vinyl plank flooring in your home:
- Let the luxury vinyl acclimate — Bring your luxury vinyl planks or tiles into the installation room and let it acclimate for 48 hours before you place it.
- Prepare the space — Remove baseboards, level the subfloor, and prepare any unmovable objects (such as a cupboard).
- Lay down tiles — Lay down your first tile against the wall. Tip the end of your next tile in at an angle so it aligns with the previous one. Then, angle the long side of the tile into the groove of your previous tile.
- Lock tiles into place — Once your current tile fits into the previous one, tap it with your mallet to lock the tiles together.
Continue to lay flooring and stagger the joints wherever the manufacturer suggests. Avoid installing any obvious pattern repeats next to each other so the flooring looks natural. Keep in mind that the tongues, edges, and corners of a single plank are fragile. Handle them with care. But when they’re snapped into place together, they become quite durable.
How to Install Tile Flooring
Tile floor is durable and easy to maintain. This style comes in hundreds of different colors and styles, offering a unique look to your room. Tile flooring mainly comes in three different options — ceramic, stone, or luxury vinyl.
Ceramic tiling is known for its versatility. It’s most often used in high-traffic areas like kitchens or bathrooms, but is sometimes used for bedrooms in warmer climates. This type of flooring is incredibly long-lasting and comes in a wide variety of designs. But installing ceramic tiling may be more time-consuming than vinyl or stone.
Stone tiling boasts a more natural look than ceramic or vinyl tiling. It can give your home a unique look, which will boost your resale value in the future. But that look may come at a price, as it tends to be more expensive than vinyl or ceramic. Stone tiles are also a little more brittle, meaning they may chip more easily than other types of tiles.
Luxury vinyl tile (LVT) is nearly indestructible. It’s easy to install and clean, along with being resistant to water damage. LVT floors are also made of softer materials, meaning they’re susceptible to dents and markings from heavy furniture or sharp objects.
While each type of flooring comes with its own pros and cons, they’re all perfectly suitable options for a home. As long as you take your budget, lifestyle, and the room’s foot traffic into account, there’s really no wrong choice.
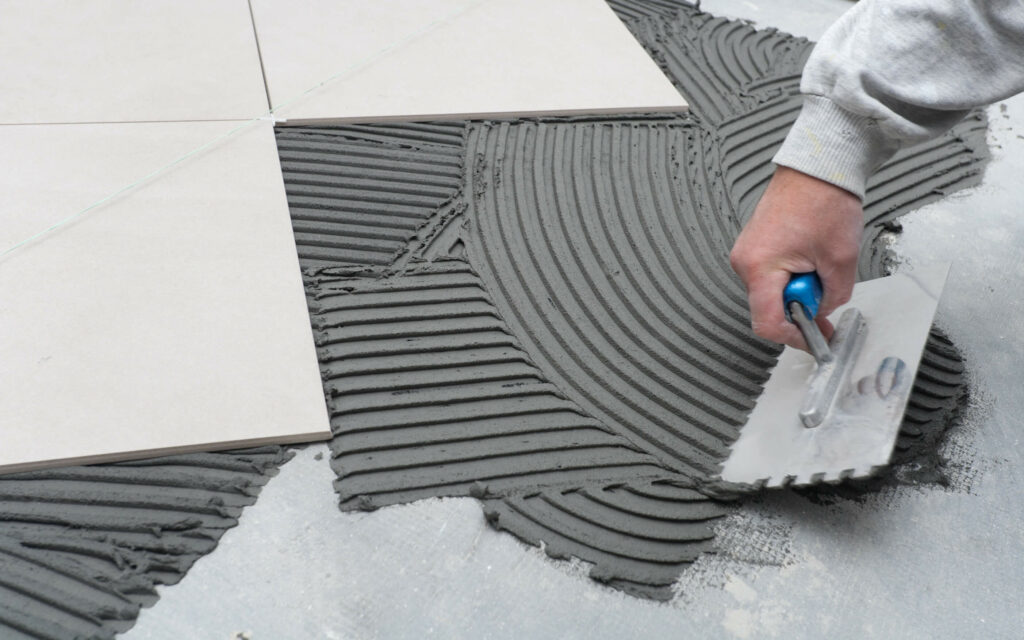
How to install ceramic tile flooring:
- Measure the area you’re tiling — Find the center of the room for the most symmetrical installation. You can do so by stretching a string across opposing corners. This will create quadrants for you to work your way into.
- Dry lay tiles — Lay your tiles out dry to see what the final product will look like. This gives you a chance to adjust the pattern or layout you’d like to go for. If needed, cut your perimeter tiles to fit the edges of your quadrants.
- Spread the mortar — Once you’re happy with the layout, remove the tiles and spread the mortar out with a trowel. Start at the center and work into the furthest quadrant from the door. Only lay out enough mortar to work with 2-3 tiles at a time.
- Lay the tiles — Press your first tile into the mortar. Place a spacer into the gap and then lay down your next tile. Make sure each tile is level.
- Cut tiles — The end of each row likely will not have enough space for a full tile. Carefully measure tiles and cut them to fit these gaps.
- Add grout to tiles — Push grout into the joints of each tile. Work it evenly into each gap.
- Clean and seal tiles — Sponge the residue off each tile and apply a grout sealer.
How to install stone tile flooring:
- Cut the membrane — Roll the membrane flocked-side down along the room’s longest wall. Once you reach the wall, crease the roll into the corner and cut. Lay and cut the remaining sections so they cover the entire floor. Number those sections and then set them aside.
- Spread the thinset — Follow manufacturer instructions to mix a batch of thinset. Start at a corner and spread the mix evenly over a six-foot section that is as wide as the membrane you laid down. Comb it into long, parallel furrows with a 1/4-inch notched trowel.
- Roll the membrane out — Roll the first membrane section into the corner over the fresh thinset. Alternate spreading thinset and rolling membrane until the floor is covered. Use a grout float to firmly set the membrane into place.
- Dry lay tiles — Once the floor is covered, dry lay a line of tiles between the walls to check the layout and judge which tiles need to be cut to size.
- Place the tiles — Spread and comb out thinset over an area that’s about 3 feet by 16 inches. Take a tile, spread thinset on its underside, and press it into place. Remove excess thinset with a putty knife and swab each stone tile with a damp sponge. Repeat until the room is tiled.
- Grout the joints — The next day, wash away thinset residue with muriatic acid and apply a sealer to the tiles. When that is dry, push sanded grout into the joints with a grout float. Wipe residue from the stone with a sponge. Apply a final sealer coat the next day.
How to install vinyl tile flooring:
- Let the tile acclimate — Bring your tile into the installation room and let it acclimate for 48 hours before you place it.
- Remove the old flooring — Remove the baseboards, pull up the old flooring, and remove the adhesive used to secure it.
- Prepare the subfloor — Clear the floor of anything that will prevent the LVT from laying flat. Once the floor is cleared, thoroughly vacuum it. Use a latex-based flooring primer to prime the subfloor.
- Mark the starting line — Take a string and stretch it from one corner of the wall to its opposing corner. Do the same for the remaining corners. Those lines will form an X in the exact middle of your room — that will be your starting point.
- Dry lay tiles — Lay your tiles out dry to see what the final product will look like. Adjust the pattern or layout if needed. This will also give you the opportunity to cut your perimeter tiles to fit the edges of your quadrants.
- Place tiles — Peel the backing off your tile and place it in the middle of your room. Work your way into one of the quadrants in the room. Repeat with each quadrant in the room. Cut tiles to fit the ends of each row when needed.
- Grout tile — If manufacturer instructions call for this, grout the tiles. User spacers in between each tile and apply a vinyl tile-specific grout.
- Finish the floor — Roll over the entire floor with a 100-pound roller to help the adhesive bond. Replace the trim along the wall.
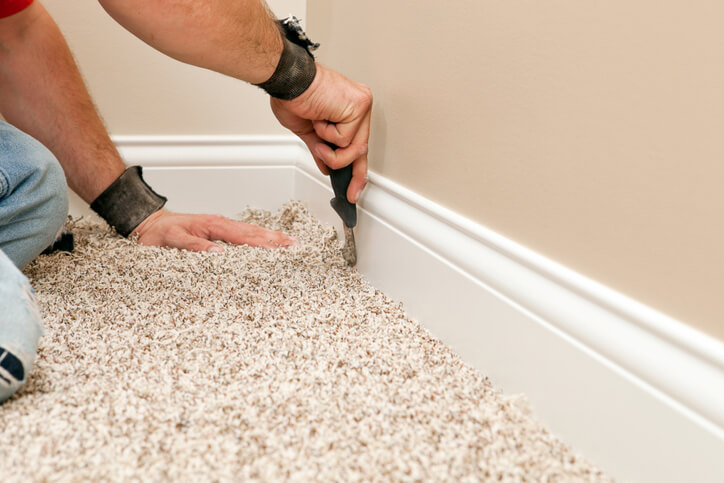
How to Install Carpet
The popularity of carpeted flooring may have ebbed and flowed over recent decades, but the benefits remain the same. Carpet absorbs sound well, provides a comfortable walking surface, and can complement the decor of nearly any room. You can find carpets in nearly every price point. Here’s how to install carpeting in your home:
- Measure the room — Add 10-20 percent to your total square footage to account for any discrepancies in size.
- Remove old carpet, doors, and baseboard molding — Make sure you’re working with a clear, clean, and flat surface before installation.
- Prepare your floor — Remove any glue, nails, or paint from the floor and smooth the surface out. Sweep out debris and wash the floor. Once it’s dry, you can begin.
- Nail down tack strips — Install tack strips around the perimeter of the room to hold your carpet in place. Position the strips about a half-inch from the wall and angle the tacks away from the center of the room.
- Install carpet padding — Cut your padding to the correct size. Lay strips of padding from the inside edge of a tack strip to the opposite inside edge. Make sure the edge of each strip of padding butt up against each other. Once the entire room has been padded, staple the padding to the inside edge of the tack strips.
- Cut the carpet — The next day, cut your carpet to size. Consider leaving a little extra material so your stretched-out carpet will fit as intended.
- Roll out the carpet — Start in one corner and leave 3-4 inches of excess carpet up against the wall. Position the carpet so that it makes tight seams, but still completely covers the tack strips and the floor.
- Tape and seal the seams — Use tape seams to join multiple sections of carpet. Apply the tape underneath the carpet seam, adhesive side up, then melt the adhesive with a seaming iron. Press down on the carpet edges you are connecting and then seal the seam with a carpet roller.
- Stretch and tack the carpet — Attach the carpeting to the tack strips using a knee kicker to prevent lumps in your carpeting. Start in a corner and work your way along the wall. Hit the knee knicker about once per foot of carpet. If you’re carpeting a large room, consider renting a power stretcher to do the job.
- Trim excess carpet — After your carpet has been stretched out, you should see excess carpet around the edges of the room. Trim it off with a utility knife.
How to Install Sheet Vinyl Flooring:
As we previously mentioned, vinyl is durable, affordable, and water-resistant. installing it in sheets is a user-friendly DIY project. Here’s how you install sheet vinyl flooring:
- Clear off the floor — Remove the furniture, appliances, floor trim, and trim nails.
- Prepare the floor — New vinyl can be laid over old vinyl if the existing floor is level and in good condition.
- Install the underlayment — Cut through the bottom edges of the door molding so you can slide the underlayment through. Nail down any loose flooring and install the underlayment. Use a ready-mix floor leveler or cement patching compound to level any uneven areas of the floor.
- Cut your floor to size — Take the square footage of your room and cut the floor three inches wider than the area on each side.
- Lay down the vinyl — Position the vinyl and trim the excess from all corners.
- Apply the adhesive — Fold back half of the floor and apply the manufacturer-recommended adhesive to the subfloor with a notched trowel. Let it sit as long as the instructions recommend. Repeat with the rest of the flooring. Use a roller to fully secure the vinyl to the subfloor. Remove excess adhesive and allow it to dry.
How to Select a Flooring Installer
With enough time, effort, and patience, installing flooring yourself is possible. But there’s no shame in leaving it in the hands of the flooring experts. However, you shouldn’t pick just any contractor to do the job. Consider the following points before hiring someone to install your floor.
- Ask your family and friends for referrals — There’s no better referral than word of mouth from someone you trust. If any of your friends or family members have recently redone their floors, talk to them about the installer they used. If that person was happy with the end result, do a little research and see if their contractor is right for you.
- Look at online reviews — Whether you get a recommendation or come across an installer on your own, look at the online reviews before you consider moving forward. Every business has a mix of positive and negative reviews on its online profiles. But if you see repeating red flags across different reviews, you’ll know not to move forward with that company.
- Ask contractors about their qualifications — Your floor is always on display, so you want a skilled and experienced installer to lay it. While there’s no need to hire a contractor with decades of experience, make sure to go with one that has been in business for a while. You’ll also want to go with an installer that has experience in the type of flooring you’re looking for. Some floors are more complicated than others, so you’ll want a contractor who understands what they’re getting into.
- Request a quote from multiple flooring installers — As a general rule of thumb, you should always seek out quotes from a few different contractors before making a decision. That way, you’ll have a full understanding of what the market price is and if it works with your budget.
- Understand the details of each installer’s quote — When you receive a quote, ask for the breakdown of that number. Does the contractor charge by square or linear footage? Does the cost include the price of materials? Understand this number before moving forward so there are no surprises along the way.
- Ask how each contractor handles issues during or after installation — Unforeseen issues could easily arise during the job or present themselves weeks after it is complete. Ask each contractor how they would handle situations like these. Go with the one whose answer you are most comfortable with.
Why You Should Choose Martin’s Flooring Professional Installers
At Martin’s Flooring, we want you to feel confident and happy with the floor that adorns your home. We want to work with you to create and install one that’s as beautiful as the floor you imagined in your dreams. That’s why we offer our customers The Beautiful Guarantee®.
Any of our products with a Titanium, Platinum, or Gold SelectAFloor™ warranty carry The Beautiful Guarantee®. If you’re not happy with the flooring we install for you, we’ll replace it within the allotted warranty timeframe with a flooring option in the same category — free of charge. We want you to love your floor, so we’ll do whatever we can to make that happen.
Take a look at our online reviews. Talk to any friends and family members who have used Martin’s Flooring and taken advantage of The Beautiful Guarantee®. If you like what you hear, schedule a Shop-at-Home appointment today. If you have any questions or concerns, give us a call and we’d be happy to talk through whatever is on your mind. We’re ready to be your partners through this journey.
TL;DR – Flooring Installation is a Challenging but Rewarding Home Renovation Project
When it’s time to redo your floor, consider your personal style, budget, and room location to decide which type of flooring is right for you. If you’re going to take the job on yourself, study our outlined steps before laying down your flooring. But if you’d rather go with a professional installer, do your research and ask the right questions before hiring someone to give you the floor of your dreams.
We hope you’ll choose Martin’s Flooring to install the perfect floor for your home. Schedule a Shop-at-Home consultation and we’ll bring the showroom to you. After an initial phone consultation, one of our professionals will come to your home with a wide assortment of product samples to get the process started.